@Transactional 异常分类:
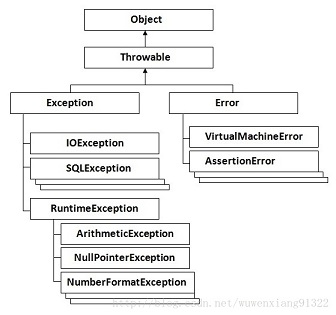
Exception下分可检查异常(check exceptions)和不可检查异常(unchecked exceptions)。
可检查异常 :Exception下除了RuntimeException外的异常不可检查异常 :RuntimeException及其子类和错误(Error)不对运行时异常进行处理,要么线程终止,要么主程序终止。如果不想终止则必须捕获异常。
非运行时异常,除运行时异常以外的Exception包括用户自定义的异常,Java编译器强制要求对其进行catch / throws并处理,否则无法通过。
@Transaction 默认只有在抛出不可检查异常时才标识事务回滚。
让checked例外也回滚:在整个方法前加上 @Transactional(rollbackFor=Exception.class)
让unchecked例外不回滚: @Transactional(notRollbackFor=RunTimeException.class)
不需要事务管理的(只查询的)方法:@Transactional(propagation=Propagation.NOT_SUPPORTED)
Note:
如果异常被try{}catch{}了,事务就不回滚了,如果想让事务回滚必须再往外抛try{}catch{throw Exception}。
Spring团队的建议是你在具体的类(或类的方法)上使用 @Transactional 注解,而不要使用在类所要实现的任何接口上 。你当然可以在接口上使用 @Transactional 注解,但是这将只能当你设置了基于接口的代理时它才生效。因为注解是不能继承的,这就意味着如果你正在使用基于类的代理时,那么事务的设置将不能被基于类的代理所识别,而且对象也将不会被事务代理所包装(将被确认为严重的)。因此,请接受Spring团队的建议并且在具体的类上使用 @Transactional 注解。
@Transactional 注解标识的方法,处理过程尽量的简单 。尤其是带锁的事务方法,能不放在事务里面的最好不要放在事务里面。可以将常规的数据库查询操作放在事务前面进行,而事务内进行增、删、改、加锁查询等操作。
@Autowired @Autowired注解标注类成员变量、方法、构造函数这些位置,可以实现自动装配的工作。
@Autowired使用规则:
@Autowired默认是按照类型进行匹配的(byType),默认情况下,它要求依赖对象必须存在,否则会报错,当然我们也可以设置@Autowired(required=false)来设置。
@Autowired的查找过程如下:
@Autowired注解在容器中查找对应类型的bean
如果结果刚好为一个,则将该bean装配给@Autowired指定的变量
如果一个也没有,并且required=true的情况下,则报错
如果为多个,则也会报错,因为Spring不知道该依赖哪一个具体的bean
@Autowired按byType自动注入,而@Resource默认按 byName自动注入罢了。
两个同一个类型的注解,Autowired将无法区分
@Service 如果 Web 应用程序采用了经典的三层分层结构的话,最好在持久层、业务层和控制层分别采用 @Repository、@Service 和 @Controller 对分层中的类进行注释,而用 @Component 对那些比较中立的类进行注释。
Spring2.5为我们引入了组件自动扫描机制,他可以在类路径底下寻找标注了@Component, @Service, @Controller, @Repository 注解的类,并把这些类纳入进spring容器中管理。它的作用和在xml文件中使用bean节点配置组件时一样的。
@Service、@Repository、@Controller、@Component这四个作用差不多,主要适用于区别该类在Web应用中所属的层次。例如MVC。
@RequestMapping
方法不为public也能访问
这个注解会将HTTP请求映射到MVC和REST控制器的处理方法上。(就是配置Web请求映射)
这个注解可以放在类上也可以放在方法上。放在类级别上,会将一个请求或者请求模式映射到一个控制器上。放在方法上,可以进一步制定处理方法的映射关系。
@RequestMapping可以处理多个URI,将多个请求映射到一个方法上。
1
2
3
4
5
6
7
8
9
10
11
12
13
14
@RestController @RequestMapping("/home") public class IndexController @RequestMapping(value = { "", "/page", "page*", "view/*,**/msg" }) String indexMultipleMapping () { return "Hello from index multiple mapping." ; } }
@RequestMapping处理HTTP的各种方法。
1
2
3
4
5
6
7
8
9
10
11
12
13
14
15
16
17
18
19
20
21
22
23
24
@RestController @RequestMapping("/home") public class IndexController @RequestMapping(method = RequestMethod.GET) String get () { return "Hello from get" ; } @RequestMapping(method = RequestMethod.DELETE) String delete () { return "Hello from delete" ; } @RequestMapping(method = RequestMethod.POST) String post () { return "Hello from post" ; } @RequestMapping(method = RequestMethod.PUT) String put () { return "Hello from put" ; } @RequestMapping(method = RequestMethod.PATCH) String patch () { return "Hello from patch" ; } }
用@RequestMapping来处理生产和消费对象
使用该注解的produces\consumes这两个元素来缩小请求映射类型的范围。为了能用请求的媒体类型来产生/消费对象,可以结合@ResponseBody注解来完成
1
2
3
4
5
6
7
8
9
10
11
12
13
14
15
16
17
18
19
20
21
@RestController @RequestMapping("/home") public class IndexController @RequestMapping(value="/prod",produces ={ "application/JSON" }) @ResponseBody String getProduces () { return "Produces attribute" ; } @RequestMapping(value = "/cons", consumes = { "application/JSON", "application/XML" }) @ResponseBody String getConsumes () { return "Consumes attribute" ; } }
使用 @RequestMapping 来处理消息头
@RequestMapping注解提供一个header元素来根据请求中的消息头内容缩小请求映射的范围。
1
2
3
4
5
6
7
8
9
10
11
12
@RestController @RequestMapping("/home") public class IndexController @RequestMapping(value = "/head", headers = { "content-type=text/plain", "content-type=text/html" }) String post () { return "Mapping applied along with headers" ; } }
使用@RequestMapping来处理请求参数,进一步缩小映射范围.
1
2
3
4
5
6
7
8
9
10
11
12
13
14
15
16
17
18
@RestController @RequestMapping("/home") public class IndexController @RequestMapping(value = "/fetch", params = { "personId=10" }) String getParams (@RequestParam("personId") String id) { return "Fetched parameter using params attribute = " + id + "in function: getParams()" ; } @RequestMapping(value = "/fetch", params = { "personId=20" }) String getParamsDifferent (@RequestParam("personId") String id) { return "Fetched parameter using params attribute = " + id + "in function: getParamsDifferent()" ; } }
使用 @RequestMapping 处理动态 URI
1
2
3
4
5
6
7
8
9
10
11
12
13
14
15
16
17
18
@RestController @RequestMapping("/home") public class IndexController @RequestMapping(value="/fectc/{id}", method = RequestMethod.GET) String getDynamicUriValue (@PathVariable String id) { System.out.println("ID is:" +id); return "Dynamic URI parameter fetched" ; } @RequestMapping(value = "/fetch/{id:[a-z]+}/{name}", method = RequestMethod.GET) String getDynamicUriValueRegex (@PathVariable("name") String name) { System.out.println("Name is " + name); return "Dynamic URI parameter fetched using regex" ; } }
RequestMapping默认的处理方法
1
2
3
4
5
6
7
8
9
10
11
12
@RestController @RequestMapping("/home") public class IndexController @RequestMapping() String defaultMapping () { return "This is a default method for the class" ; } }
RequestMapping快捷方式
1
2
3
4
5
6
7
@GetMapping @PostMapping @PutMapping @DeleteMapping @PatchMapping
@RequestParam @RequestParam注解配合使用,将请求的参数同处理方法的参数绑定在一起。
1
2
3
4
5
6
7
8
9
10
11
12
13
14
15
@RestController @RequestMapping("/home") public class IndexController @RequestMapping(value = "/id") String getIdByValue (@RequestParam("id") String personId) { System.out.println("ID is " + personId); return "Get ID from query string of URL with value element" ; } @RequestMapping(value = "/personId") String getId (@RequestParam String personId) { System.out.println("ID is " + personId); return "Get ID from query string of URL without value element" ; } }
@RequestParam 注解的 required 这个参数定义了参数值是否是必须要传的。
1
2
3
4
5
6
7
8
9
10
11
@RestController @RequestMapping("/home") public class IndexController @RequestMapping(value = "/name") String getName (@RequestParam(value = "person", required = false) String personName) { return "Required element of request param" ; } }
@RequestParam注解的defaultValue参数就是用来给取值为空的请求参数提供一个默认值
1
2
3
4
5
6
7
8
@RestController @RequestMapping("/home") public class IndexController @RequestMapping(value = "/name") String getName (@RequestParam(value = "person", defaultValue = "John") String personName) { return "Required element of request param." +"personName:" +personName; } }
@ResponseBody 其作用是,将java对象转为json格式的数据。
@responseBody注解的作用是将controller的方法返回的对象通过适当的转换器转换为指定的格式之后,写入到response对象的body区,通常用来返回JSON数据或者是XML数据。
@PathVariable @PathVariable只支持一个属性value,类型是String,代表绑定的属性名。默认绑定同名参数。用来便捷地提取URL中的动态参数。
1
2
3
4
5
6
7
8
@RequestMapping("/viewUser/{id}/{name}") public Map<String, Object> viewUser (@PathVariable("id") Integer idInt, @PathVariable Integer name) System.out.println("@PathVariable中 请求参数 id = " + idInt); Map<String, Object> user = new HashMap<>(); user.put("id" , idInt); user.put("name" , name); return user; }
与RequestParam不同,这个将请求的参数与函数的参数绑定在一起。
@RequestBody 在我们的请求到达controller之前,也就是到达DispacherServlet中心处理器的时候,如果有@RequestBody会对参数进行一次解析,把json字符串解析出对象,也就是说只解析一次,两个@requestBody只能弄一个,对象的json是以“{”开头,list的json是以“[”开头 ,所以基本都是json解析出错

查看两个Body的源码 @Bean
@Bean 注解全解析
Spring注解之@Bean 用法介绍
注解 @Bean是一个方法级别的注解,主要用在@Configuration注解的类 里,也可以用在@Component注解的类 里,默认添加的bean的id为方法名。
@Bean的依赖 1 2 3 4 5 6 7 @Configuration public class AppConfig @Bean public TransferService transferService (AccountRepository accountRepository) return new TransferServiceImpl(accountRepository); } }
自定义Bean别名 1 2 3 4 5 6 @Bean("myBeanObj") public BeanTest getBeanObj () BeanTest bean = new BeanTest(); System.out.println("调用方法:" + bean); return bean; }
通过下面的方法可以定义多个别名:
1 @Bean(name = { "myBeanObj", "myBeanObj1", "beanObj" })
实践
1 2 3 4 5 6 7 8 9 10 11 12 13 14 15 16 17 18 19 20 21 22 23 24 25 26 27 28 29 30 31 32 33 @RunWith(SpringJUnit4ClassRunner.class) @ContextConfiguration( classes = TestBean.class ) public class TestForBean @Autowired BeanClass beanClass; @Test public void loadBeanClass () beanClass.getInfo(); } } public class BeanClass Logger logger = LoggerFactory.getLogger(BeanClass.class); public BeanClass () logger.info("=====" ); } public void getInfo () logger.info("getInfo" ); } } @Service public class TestBean @Bean public BeanClass getBeanClass () return new BeanClass(); } }


